Choosing the right layer height for 3D printing materials like PLA, ABS, PETG, TPU, and resin directly affects print quality, strength, and print time. This guide explains the best layer height settings for each material, why they work, and how to adjust them for different print goals.
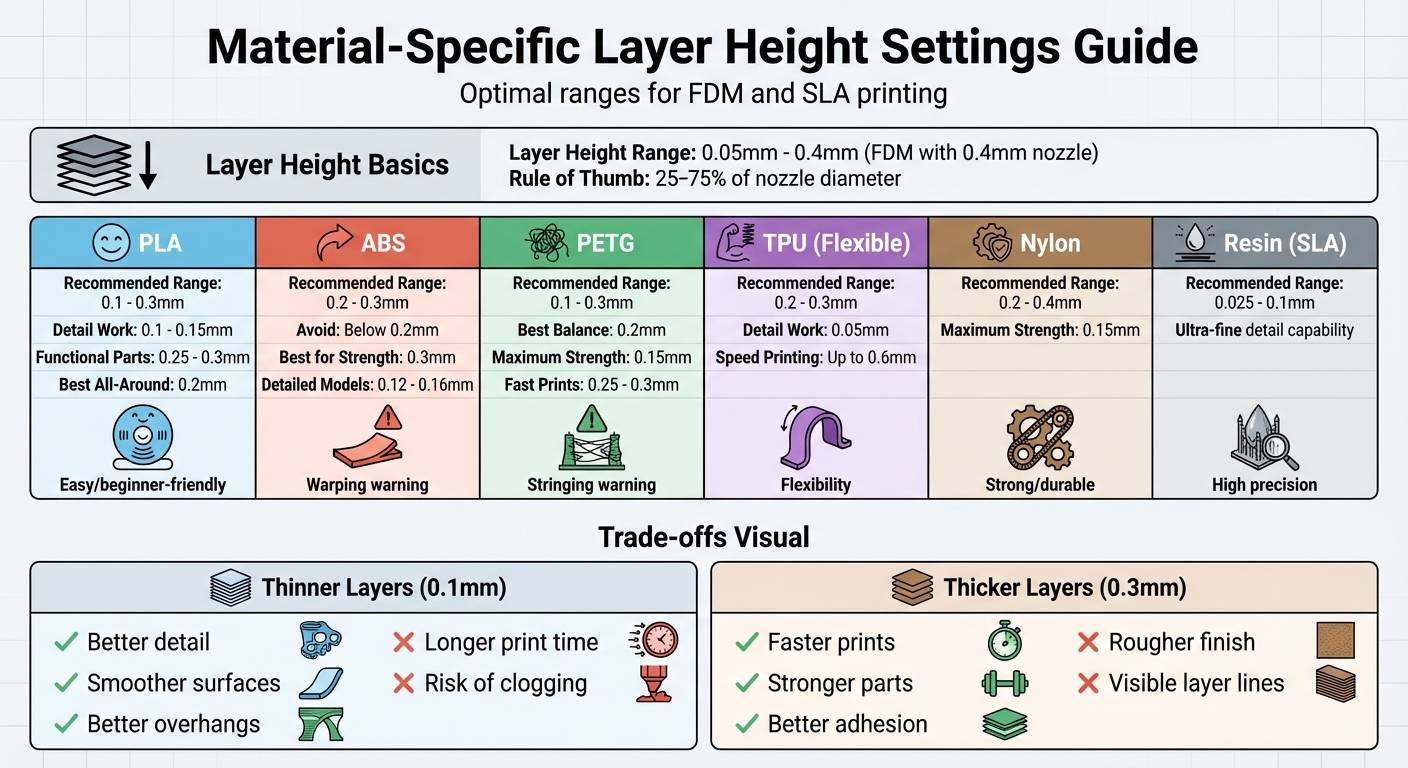
- Layer Height Basics: Measured in millimeters, it determines the vertical thickness of each layer. Commonly ranges from 0.05 mm to 0.4 mm for FDM printers with a 0.4 mm nozzle.
-
Key Impacts:
- Thinner layers (e.g., 0.1 mm): Better detail and smoother surfaces but longer print times.
- Thicker layers (e.g., 0.3 mm): Faster prints and stronger parts but rougher finishes.
-
Material-Specific Guidelines:
- PLA: Works well with 0.1–0.3 mm. Use thinner layers for detail, thicker for strength and speed.
- ABS: Stick to 0.2–0.3 mm to reduce warping and improve layer adhesion.
- PETG: Flexible with 0.1–0.3 mm, but adjust settings to minimize stringing.
- TPU/Nylon: Use 0.2–0.3 mm for flexibility and strength, but slower speeds help prevent deformation.
- Resin (SLA): Achieves ultra-fine detail with 0.025–0.1 mm layers.
Quick Tips:
- For a 0.4 mm nozzle, set layer height to 25–75% of the nozzle diameter.
- Thicker layers improve speed and adhesion, while thinner layers enhance detail.
- Adjust settings based on material behavior, like cooling and adhesion properties.
Read on for detailed material-specific advice and troubleshooting tips for common printing challenges.
Best Layer Height Settings for PLA
Recommended Layer Height Range for PLA
When working with PLA and a standard 0.4 mm nozzle, you’ll find that a layer height between 0.1 mm and 0.3 mm delivers dependable results. This range makes it easy to adjust settings for different types of projects. For most everyday prints, a 0.2 mm layer height strikes a great balance between detail and print speed.
For prints requiring fine details - like miniatures, figurines, or objects with intricate designs - a layer height of 0.1 mm to 0.15 mm works best. This reduces visible layer lines and creates smoother curves. Many users find that 0.15 mm offers an excellent compromise between strength and surface quality. On the other hand, for functional parts such as brackets, jigs, or large prototypes, thicker layers in the range of 0.25 mm to 0.3 mm are ideal. These settings significantly reduce print time while still providing enough strength for practical applications.
Now, let’s explore how layer height influences the balance between speed and surface quality.
Speed vs. Quality Trade-Offs with PLA
The connection between layer height and print time is pretty straightforward: increasing the layer height can almost cut your print time in half. For instance, a print that takes 10 hours at 0.1 mm might only take about 5 hours at 0.2 mm and roughly 3–4 hours at 0.3 mm.
Thinner layers improve surface quality by minimizing the "stair-stepping" effect, especially on curved or angled surfaces. They also handle overhangs better since each new layer is closer to the edge of the one beneath it. In contrast, thicker layers result in more noticeable layer lines and a rougher, more angular appearance. However, they’re perfectly fine for projects where the final look isn’t critical and you need to save time.
Best Layer Height Settings for ABS
Recommended Layer Height for ABS
When working with ABS, sticking to a layer height of 0.2–0.3 mm generally yields the best results. Going below 0.2 mm can lead to smearing issues due to the material's higher printing temperature.
"With ABS, you want to be more conservative with your layer height. Try not to print under 0.20mm, and the best layer height for ABS is closer to 0.30mm (if the resolution isn't the main focus)." – 3DSourced
Thicker layers not only enhance adhesion but also help minimize warping by retaining heat longer - particularly beneficial when printing in an enclosed chamber. For functional prints where strength is the priority, sticking to 0.2–0.3 mm is ideal. However, for detailed aesthetic models, thinner layers in the range of 0.12–0.16 mm can be used, though this will increase print time and demand more precise cooling.
Fixing Common ABS Problems
ABS is notorious for warping and layer separation, often caused by uneven cooling. The sharp temperature difference between the heated bed (typically set at 70–100°C or 158–212°F) and the surrounding air can exacerbate these issues.
Layer height plays a key role in combating these problems. Using thicker layers helps retain heat longer, improving layer bonding. Pairing this with a larger nozzle diameter can further enhance mechanical adhesion.
To control cooling, keep the part fan at 0–30% or turn it off entirely for the initial layers. This ensures the layers bond while still warm. An enclosed printer is also a game-changer, maintaining a steady ambient temperature of around 60–90°F (15–32°C) to allow the ABS to cool more slowly and evenly.
"The trick to have ABS parts stay on the bed during a print and not split after being printed is to allow the printed part cool as slowly as possible, and as uniformly as possible." – MatterHackers
Still running into delamination issues, especially with larger prints? Try these adjustments:
- Reduce infill to lower internal stresses.
- Add extra shell walls for better structural integrity.
- Slow down the print speed and slightly increase the nozzle temperature to improve layer bonding.
These tweaks can make a noticeable difference, ensuring your ABS prints stay strong and warp-free.
Next, we’ll dive into PETG layer height settings.
Best Layer Height Settings for PETG
Recommended Layer Heights for PETG
When printing with PETG, you have a lot of flexibility with layer heights, ranging from 0.1 mm to 0.3 mm, depending on your project goals. For most prints, a 0.2 mm layer height offers a solid middle ground, balancing surface quality, strength, and print time. If strength is your priority, go for a 0.15 mm layer height, as thinner layers improve interlayer adhesion. For even finer details and stronger bonds, stick to the 0.1–0.15 mm range, though this will increase print time. On the other hand, if you're aiming for faster prints with functional parts, thicker layers between 0.25 and 0.3 mm can save time while still delivering acceptable results.
After selecting your layer height, fine-tune settings like temperature, fan speed, and the first-layer gap to address PETG's tendency to string.
Adjusting PETG Settings for Better Results
Stringing is a common challenge with PETG, but it can be minimized by tweaking a few settings. Start by lowering your nozzle temperature by 5–10°C, staying within the recommended range of 220–250°C. Also, ensure your filament is dry, as PETG absorbs moisture easily, which can worsen stringing issues.
Fan speed is another key factor. Turning the cooling fan off during crucial layers can improve layer bonding and toughness. However, if you're working on small features or need sharper details, increasing the fan speed can help manage oozing and create cleaner edges.
For the first layer, consider slightly increasing the gap compared to what you'd use for PLA. This adjustment allows the filament to lay down gently instead of being overly compressed against the build plate. Not only does this reduce the risk of excessive adhesion, but it also makes removing your finished print much easier.
Up next, we'll dive into layer height recommendations for flexible materials like TPU and nylon, as well as tips for resin printing.
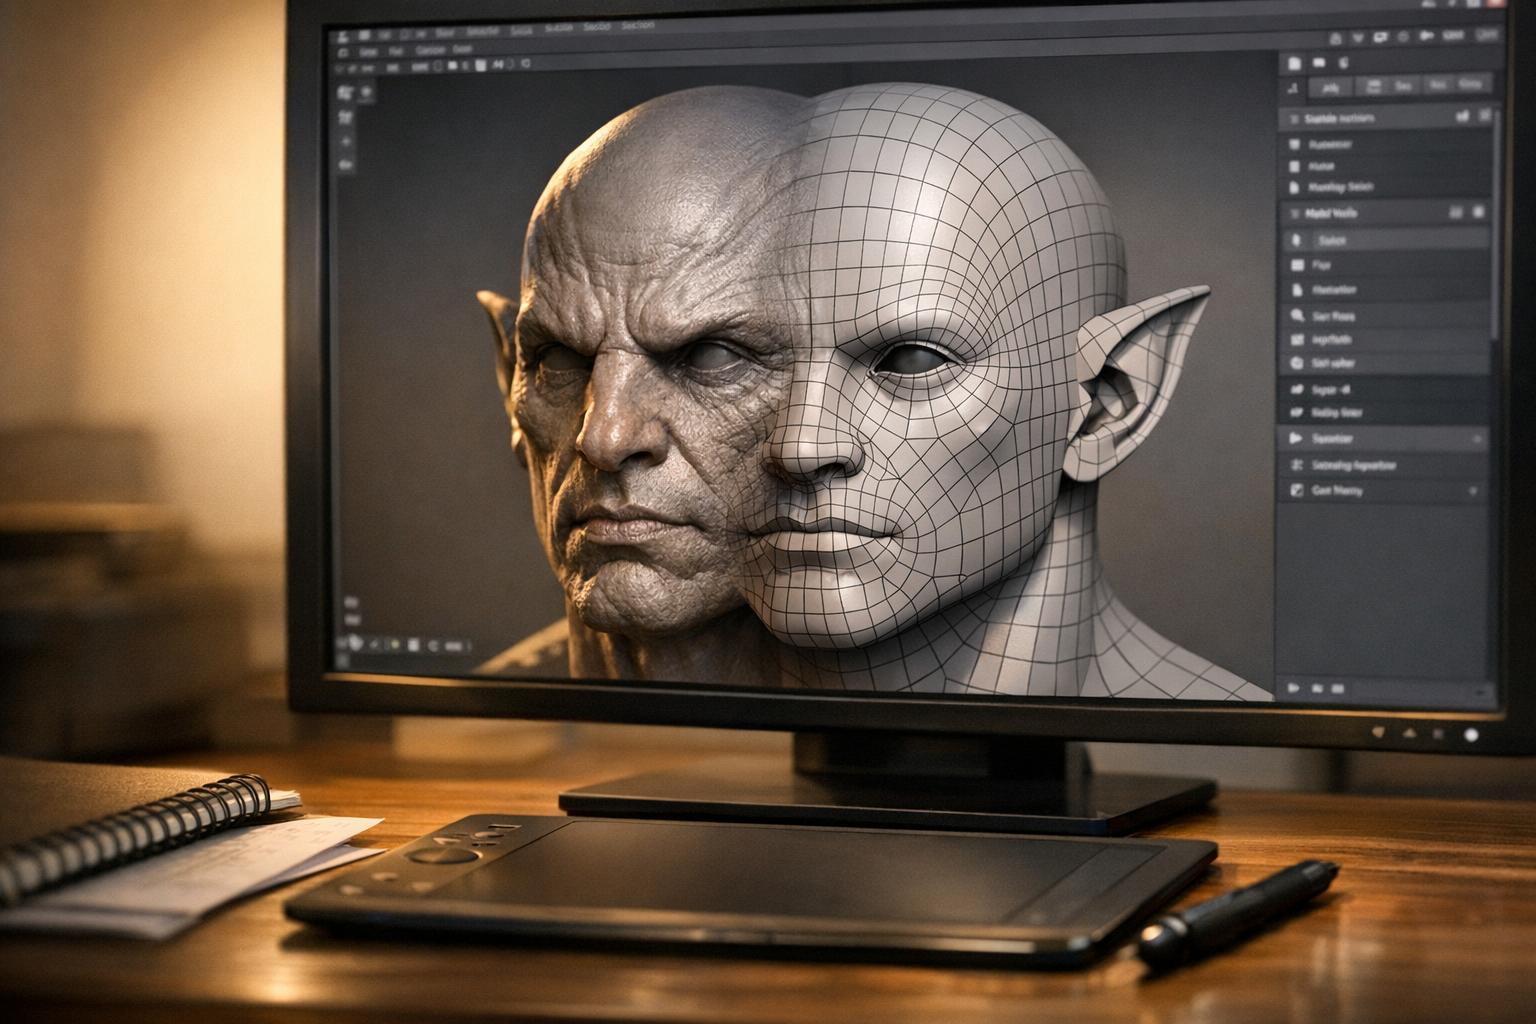
Which LAYER HEIGHT gives you the STRONGEST 3D prints?
sbb-itb-d35aaa6
Best Layer Heights for TPU, Nylon, and Resin
Let’s dive into the layer height recommendations for flexible materials like TPU and Nylon, as well as for SLA resin printers.
Recommended TPU and Nylon Layer Height Settings
When working with TPU, the typical layer height falls between 0.2 mm and 0.3 mm. For projects requiring intricate details, you can go as low as 0.05 mm, while increasing to 0.6 mm can speed up the process. Adding thicker walls and higher infill levels can also improve the structural strength of your flexible TPU prints.
For Nylon, the sweet spot is between 0.2 mm and 0.4 mm. Although thinner layers - around 0.15 mm - can enhance strength, using a broader range helps reduce the risk of warping. To achieve better results, lower the print speed, increase fan cooling, and maintain high hotend and bed temperatures. These adjustments improve adhesion and minimize warping issues.
Resin Layer Heights for SLA Printers
SLA printers specialize in precision, achieving layer heights from 0.025 mm to 0.1 mm by curing liquid resin with light. This process allows for exceptionally detailed prints.
"Resin- and laser-based printers typically have a much smaller minimum compared to FDM printers, which is what accounts for the insanely detailed prints they can create." - All3DP
The ultra-fine layer heights in SLA printing result in smooth surfaces and intricate details, making these printers perfect for projects like miniatures or jewelry where surface quality matters most. However, thinner layers mean longer print times, so finding the right balance between detail and production speed is key.
Tips for Better Layer Height Results
Getting the right layer height is all about finding a balance between how the material behaves and the geometry of your model.
Using Variable Layer Heights
Variable layer heights let you adjust the thickness of different parts of your model to save time without losing quality. For example, you can use thicker layers (around 0.3 mm) for flat areas and thinner layers (approximately 0.1–0.12 mm) for curved sections. The good news? Most modern slicers handle the transitions between these layer heights smoothly, so the final print looks consistent.
Fixing Common Layer Height Problems
If you're noticing issues like layer separation or cracking, it might be because your layer height is set too high. For a 0.4 mm nozzle, a layer height in the range of 0.16 mm to 0.2 mm generally provides better bonding between layers. Additionally, starting with a slightly thicker initial layer (0.20–0.32 mm) can improve first-layer adhesion.
A clean build plate is crucial for proper adhesion, so make sure it's spotless. Also, double-check that your slicer settings match your specific bed type.
For smoother surfaces, particularly on curves or angled sections, try reducing the layer height to about 0.1 mm. But keep in mind, going below 0.1 mm often isn't worth the extra print time and could lead to problems like over-extrusion or nozzle clogs.
These tweaks can simplify your print preparation process, and tools like Sloyd make it even easier.
How Sloyd Helps with Print Preparation

Sloyd’s 3D editor is designed to create models with clean topology and optimized geometry. This ensures that slicing is predictable, improving layer bonding and reducing the chances of print failures. It’s especially handy when working with tricky materials or very fine layer heights.
Conclusion
Your choice of material plays a key role in determining the ideal layer height settings. Finding the right balance means understanding how each material behaves and aligning it with your printing goals. Factors like cooling behavior, adhesion, and temperature needs all influence how well layers bond. While thinner layers offer greater detail, they also increase print time. On the other hand, thicker layers speed up the process but may compromise surface smoothness.
Start with the recommended layer height ranges for your material, adjust as needed based on your results, and take advantage of tools like Sloyd's 3D editor to achieve precise slicing and consistent layer bonding for any project.
FAQs
How do I choose the right layer height for different 3D printing materials?
Choosing the right layer height is a balancing act that depends on your printer’s hardware, the material you’re printing with, and what you’re trying to achieve. Start by looking at your nozzle size. Generally, layer heights fall between 20% and 80% of the nozzle diameter, though most prints work best within the 50%–75% range. For a standard 0.4 mm nozzle, this translates to a layer height between 0.1 mm and 0.32 mm, with 0.2 mm being a reliable starting point. Thinner layers, like 0.1 mm, give you smoother surfaces and finer details but take longer to print. On the other hand, thicker layers, such as 0.3 mm, print faster but can leave more noticeable layer lines.
The material you’re using also plays a big role. PLA is quite flexible, but increasing the layer height from 0.16 mm to 0.28 mm can reduce its strength by up to 27%. ABS, however, tends to perform better with slightly thicker layers to ensure reliability. For materials like nylon and other high-temperature options, sticking to moderate layer heights helps avoid issues like delamination. PETG usually works well with a standard 0.2 mm layer height, but if you go too low, you might run into stringing problems.
Ultimately, the purpose of your print is just as important. Thicker layers are ideal for functional parts where strength and speed matter most. On the flip side, thinner layers are better suited for projects that demand intricate details or a polished, aesthetic finish. By considering all these factors - along with your printer’s capabilities - you can fine-tune your settings to get the best results for any project.
How does layer height impact 3D printing speed and quality?
The layer height you select plays a key role in determining the speed and quality of your 3D prints. Opting for smaller layer heights, like 0.05–0.1 mm, results in prints with finer details, smoother surfaces, and enhanced strength. The trade-off? It adds more layers, which means longer printing times.
In contrast, larger layer heights, such as 0.2–0.4 mm, can drastically cut down on print time by reducing the number of layers. However, this comes at the cost of lower resolution and a rougher surface finish. The ideal layer height ultimately depends on your project’s needs - whether precision and durability are top priorities or if speed takes precedence.
What challenges can arise when printing with materials like ABS and PETG, and how do I address them?
ABS can be challenging to work with because of issues like warping, cracking, and poor adhesion to the build plate. To tackle these problems, start with a heated bed set to about 100°C (212°F) and print in an enclosed or draft-free space to ensure even cooling. Adding a brim or raft can boost adhesion, and applying a light adhesive, like a glue stick or ABS slurry, helps secure the print further. Keep the nozzle temperature between 230–250°C (446–482°F) and avoid using cooling fans, as they can increase shrinkage and lead to cracks.
PETG, on the other hand, often faces challenges like stringing, oozing, and sticking too firmly to the bed. To cut down on stringing, adjust retraction settings and lower the nozzle temperature to around 230°C (446°F). A moderate cooling fan (30–50%) helps solidify the material without causing layer issues. For better bed adhesion, set the heated bed to 70–80°C (158–176°F) and use a light layer of glue stick or a PEI sheet. Slower print speeds, around 40–60 mm/s, and adding a brim for larger parts can also lead to smoother results.