3D File Compression Tips for Faster Game Asset Loading
Cut game load times by cleaning geometry, using LODs, GPU texture formats (BC7/ASTC/KTX2), GLB bundles, and async compressed streaming.
Want faster game loading times? Compress your 3D assets. Large 3D files often cause delays, but compression can reduce file sizes and improve performance without sacrificing quality. Here's a quick breakdown of how to optimize your assets:
- Why Compress? Smaller files mean shorter load times, reduced storage needs, and lower bandwidth costs.
- Geometry Optimization: Clean up messy models, remove hidden geometry, and use Level of Detail (LOD) to lower polygon counts for distant objects.
- Texture Compression: Use formats like BC7 for high-quality assets or ASTC for mobile. Combine PBR maps (channel packing) to save memory.
- Asset Bundling: Group assets that load together using formats like GLB. Compress bundles with Brotli or zstd for faster downloads.
- Tools to Use: Leverage tools like Unity Profiler, Unreal Engine Asset Audit, and Sloyd for clean models and optimized workflows.
Optimizing 3D Assets for Games
sbb-itb-d35aaa6
Finding Bottlenecks in Your Current 3D Assets
Before diving into compression, it’s crucial to profile your assets. Skipping this step can lead to wasted effort and might not even address the real issues. Profiling helps you understand where performance drops occur, allowing you to create a compression strategy that maintains quality while improving load times.
How to Profile Loading Times
Most game engines come with built-in tools to analyze asset loading performance. These tools can reveal where time is being spent, such as disk throughput, CPU decompression, or GPU upload times.
For example, Unity’s Profiler window offers detailed timelines of asset loading, while Unreal Engine provides tools like the Session Frontend and Asset Audit to break down memory usage for each asset. Focus on profiling heavy loading sequences - like the first level load or a scene transition - to pinpoint bottlenecks.
Once you identify performance spikes, check the file sizes of individual assets to uncover potential data bloat.
Breaking Down Asset File Sizes
After identifying problem areas, examine the file sizes of your assets. Group them into categories such as meshes, textures, audio, and animations. To stay organized, use a consistent naming convention, such as category_prefix_name (e.g., env_wall_corner_02 or prop_barrel_01). Export a size report and sort it; you’ll often find that the largest 10% of assets are responsible for most of the loading delays.
This analysis provides the foundation for setting clear quality and performance goals for each type of asset.
Setting Clear Quality and Performance Targets
Establishing clear targets is key to balancing quality and performance. Differentiate between high-detail hero assets and standard props, assigning each category specific limits for polygons and texture sizes.
| Asset Type | Recommended Triangle Budget | Recommended Collision Setting |
|---|---|---|
| Standard Props | 1,500–3,000 | Hull |
| Hero Pieces | 8,000–12,000 | Hull / Precise |
| Walkable Surfaces | Varies | Precise Convex Decomposition |
| High-Scale Meshes | Up to 50,000 (use sparingly) | Default (Bounding Box) |
For most props, use Hull collision settings to balance accuracy with CPU efficiency. Reserve Precise Convex Decomposition for intricate walkable surfaces, like stairs, where detailed geometry is critical for gameplay.
In addition to polygon limits, set texture size caps and loading time goals. These benchmarks will help your team stay focused and provide a clear way to measure progress as you optimize your assets.
Optimizing 3D Geometry for Faster Loading
Once you’ve pinpointed the bottlenecks and set clear goals, the next step is to streamline your geometry. Compression tools are most effective when they’re working with lean, well-organized data. That means the prep work you do before applying compression is just as important as the compression settings themselves.
Cleaning Up Geometry Before Compression
A quick and effective way to reduce file size is by removing hidden or internal geometry that doesn’t contribute to the final visuals. Stripping away this invisible data cuts down file size without impacting what users see.
Another powerful technique is instancing, which replaces duplicate geometry with a single stored copy. As highlighted in Spline Documentation:
"If you have 1 component and 100 instances, the scene will only store one geometry (instead of 101 geometries)."
Starting with clean source geometry also saves time later. For example, tools like Sloyd generate models with clean topology and UV maps, reducing the need for manual fixes. This is especially helpful for props and environment assets, where clean geometry can speed up the entire workflow.
Using LODs to Reduce Polygon Counts
Level of Detail (LOD) chains are another essential tool for managing polygon counts during runtime. The concept is straightforward: as a mesh moves farther from the camera, swap it for a lower-polygon version. At a distance, the loss of detail is virtually unnoticeable. For parametric shapes, keep subdivisions to a minimum - usually 1–2 levels - to avoid unnecessary polygon inflation. Designing your LOD chain with these principles helps you avoid bloated geometry while maintaining visual quality.
Mesh Compression Techniques to Know
Mesh compression should be applied during export to further optimize your assets. Tools like Google Draco use quantization and entropy coding to shrink mesh data while preserving visual fidelity. You can also pack vertex attributes into smaller data types, such as 16-bit or 8-bit integers, to reduce file size even more. When you combine clean geometry, effective LODs, and these compression techniques, you’re left with a highly optimized mesh - before even touching textures.
Next up: strategies for texture compression and packaging to complete the optimization process.
Texture Compression and Packaging Strategies
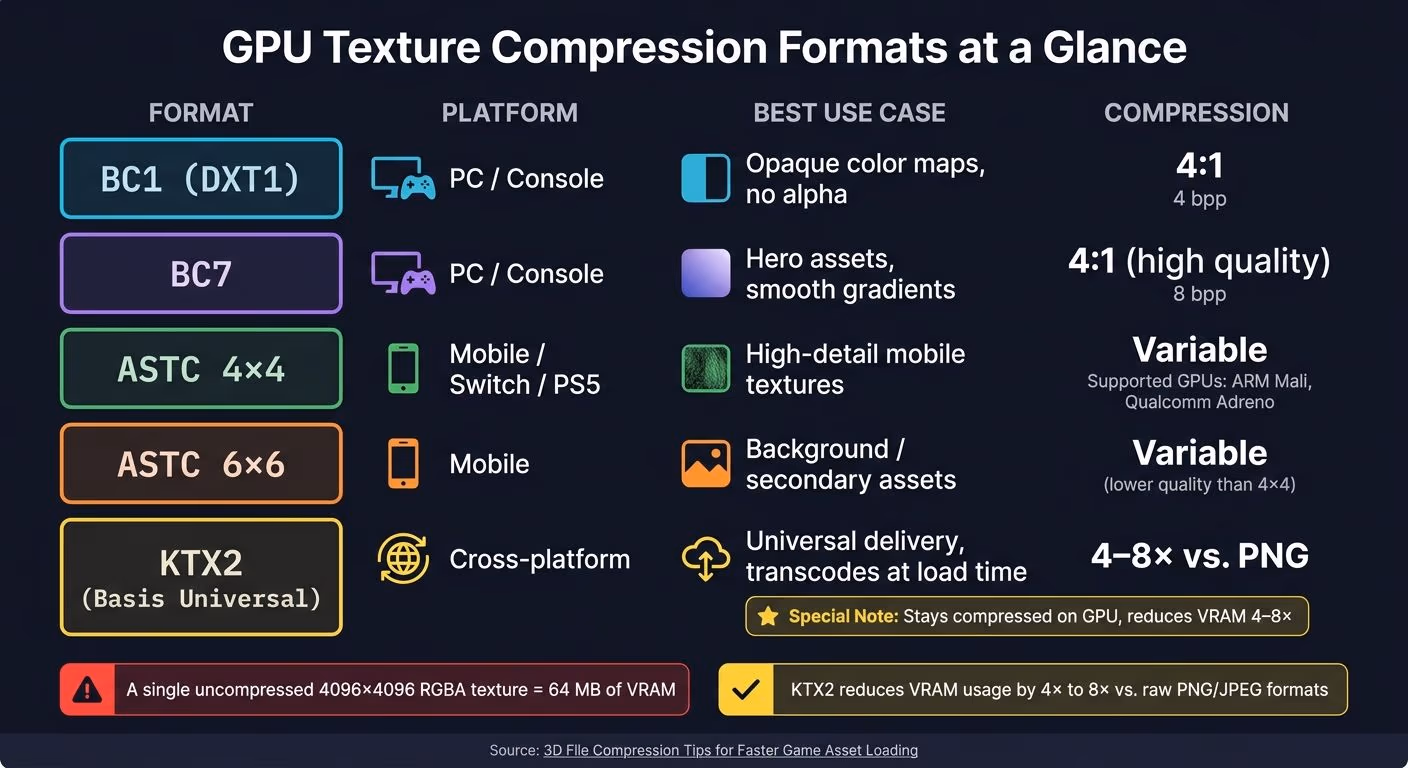
GPU Texture Compression Formats: PC, Mobile & Cross-Platform Guide
Once you've optimized geometry, textures often become the next major factor impacting memory usage and load times. For example, a single uncompressed 4096×4096 RGBA texture can eat up a hefty 64 MB of VRAM. Multiply that by dozens of assets, and the memory demand quickly escalates. By using the right compression formats and preparation techniques, you can significantly reduce this load. Here's a breakdown of the most effective strategies for managing textures.
Picking the Right GPU Texture Format
Choosing the right texture format is crucial for balancing quality and performance. On PC and console, BC7 is a top pick for high-quality assets with smooth gradients, offering excellent results at 8 bits per pixel. For opaque textures without transparency, BC1 (DXT1) provides an efficient alternative, cutting memory usage to 4 bits per pixel. This can add up to big savings when scaled across multiple assets.
For mobile platforms, ASTC is the current standard, supported by GPUs like ARM Mali and Qualcomm Adreno, as well as devices like the Nintendo Switch and PS5. Its flexibility in block sizes (ranging from 4×4 to 12×12) allows you to adjust quality and file size based on the asset's importance.
If you're working on cross-platform projects, KTX2 with Basis Universal is a strong candidate. This format stores textures in a universal form that transcodes at load time to match the GPU's native format, such as BC7 for desktops or ASTC for mobile. The result? Textures stay compressed on the GPU, reducing VRAM usage by 4× to 8× compared to raw formats like PNG or JPEG.
| Format | Target Platform | Best Use Case | Compression |
|---|---|---|---|
| BC1 (DXT1) | PC / Console | Opaque color maps, no alpha | 4:1 |
| BC7 | PC / Console | Hero assets, smooth gradients | 4:1 (high quality) |
| ASTC 4×4 | Mobile / Switch / PS5 | High-detail mobile textures | Variable |
| ASTC 6×6 | Mobile | Background / secondary assets | Variable |
| KTX2 | Cross-platform | Universal delivery | 4–8× vs. PNG |
Preparing Textures for Better Compression
One of the most effective techniques for reducing texture memory is channel packing. This involves combining multiple PBR maps (like Ambient Occlusion, Roughness, and Metallic) into a single texture, cutting down the number of texture samples needed. As Giuseppe Boschiero, Principal Technical Artist, explains:
"Channel-packing is one of the highest-leverage techniques available to a technical artist because it doesn't require a single line of code, doesn't change how anything looks, and can shave hundreds of megabytes off your texture budget."
When using BC1 compression, it's worth noting that the green channel offers 6 bits of precision (64 levels), compared to 5 bits for red and blue. Placing Roughness in the green channel can help reduce banding on smooth surfaces, potentially saving up to 50% memory compared to formats like BC3 or BC7 when transparency isn't required.
Always start with lossless PNG or TGA sources to avoid double compression, which can introduce visual artifacts and degrade quality.
Building Platform-Specific Texture Bundles
Once your textures are optimized, it's essential to tailor them for each platform. Creating platform-specific bundles ensures you balance quality and performance, avoiding wasted memory on lower-end devices while fully utilizing the capabilities of high-end hardware. Tools like Unreal Engine's Texture Groups and Cook Rules, or Unity's Texture Importer with per-platform overrides, make this process efficient.
For practical resolution guidelines:
- Use 1024px for small props.
- Opt for 2048px for medium-sized objects.
- Reserve 4096px for hero assets or large terrains.
Always use power-of-two resolutions to ensure compatibility with GPU compression algorithms. And don’t just rely on file size - check the runtime VRAM footprint in your engine's inspector.
"A 2 MB JPEG on disk might expand to several megabytes of VRAM after decoding and GPU upload... plan for runtime memory and bandwidth, not just the download size." - I Love Sprites
Packaging, Streaming, and Caching Assets Efficiently
Once you've fine-tuned your geometry and textures, the way you package and deliver these assets plays a huge role in determining load times. Even the most optimized files can experience delays if they aren't packaged and streamed correctly.
How to Build Efficient Asset Bundles
The idea behind bundling is straightforward: group assets that are loaded together. A great way to do this is by using GLB (binary glTF) files, which allow you to combine geometry, textures, and animations into a single package. This approach minimizes runtime input/output operations and speeds things up.
To keep things organized - especially in larger projects - stick to consistent naming conventions. It ensures that as your asset library grows, you can still manage it effectively. On the technical side, when dealing with physics, set collisions for standard props to "Hull" approximation instead of "Precise" decomposition. This reduces unnecessary computational strain without compromising gameplay.
Compressing Assets for Network and Disk Streaming
Compression is key to reducing both server load and client wait times. Precompress your asset bundles using tools like Brotli or zstd. These methods shrink file sizes significantly, improving download speeds.
Additionally, techniques like texture atlasing and animation compression can further reduce the amount of data that needs to be streamed, cutting down on overhead during gameplay.
Improving Runtime Decompression Performance
One of the best ways to enhance runtime performance is by implementing asynchronous loading. This ensures that assets decompress in the background without interrupting the main thread. Both Unity and Unreal Engine offer built-in support for async asset loading, so planning your bundling strategy with this in mind can make a noticeable difference.
Another performance booster is setting engine fidelity to "Automatic", which dynamically simplifies distant assets, lowering memory usage. For key "hero" assets, manually authored LODs (Levels of Detail) ensure smooth transitions while maintaining visual quality. Finally, keep triangle counts in check to strike a balance between performance and aesthetics.
Conclusion: Key Takeaways for Faster Game Asset Loading
Speeding up game asset loading requires a focused approach, applying compression and optimization techniques at every stage of the pipeline. The key is to streamline your workflow with methods like clean geometry, efficient texture formatting, and well-organized asset bundling to cut down on I/O overhead.
Striking the right balance between quality and performance often involves strategic compromises. For most in-game elements, lower-detail assets work best - for example, 5,000 triangles with 512×512 textures can maintain smooth frame rates without sacrificing noticeable visual quality. Meanwhile, save higher-detail assets - such as 40,000 triangles with 1024×1024 textures - for hero characters or cinematic sequences where detail truly matters.
Employing techniques such as LODs (Level of Detail), GLB packaging, async loading, and texture atlasing can further improve efficiency and ensure smoother gameplay.
Starting with game-ready geometry can make the entire process easier. Tools like Sloyd help by generating models with clean topology, automatic UV maps, and integrated LODs. This eliminates much of the manual cleanup and allows for faster iteration. For props and environmental assets, its Template Editor ensures you get optimized geometry that fits seamlessly into your compression workflow.
FAQs
How can I tell if load time is limited by disk, CPU decompression, or GPU upload?
To pinpoint the bottleneck, keep an eye on performance metrics during testing:
- Disk: If the total load time stretches beyond 2–5 seconds, it might signal a problem with disk performance or file reading.
- CPU: Noticeable spikes in CPU usage during import or decompression could indicate a CPU-related issue.
- GPU: When models load quickly but frame rates drop, the problem is likely tied to GPU upload or rendering.
Testing on actual devices can help validate the root cause.
Which texture format should I use for PC, console, mobile, and cross-platform builds?
For real-time applications, the GLB format with embedded textures is the best choice for performance and compatibility. When it comes to textures, PNG or JPG files are ideal for color or diffuse maps, while grayscale PNGs are perfect for roughness and metalness maps. This combination ensures quick loading times and excellent visual quality across different platforms.
When should I use GLB bundling vs separate files for streaming assets?
When choosing between GLB bundling and separate files, it comes down to your specific needs. GLB bundling is ideal when you want a single, compact file that simplifies handling and speeds up initial loading. This works best in situations where reducing network requests is crucial.
On the other hand, separate files are more effective for streaming assets. They give you greater flexibility in managing individual resources and allow you to optimize for parallel downloads and caching, which can be beneficial in certain scenarios.